OpenID Connect Integration
What is OpenID Connect (OIDC)?
OpenID Connect (OIDC) is a modern authentication protocol built on the OAuth 2.0 framework. It enables clients, known as Relying Parties (RPs), to verify the identity of an end-user based on authentication conducted by an Identity Provider (IDP), such as Incode. OIDC allows the secure exchange of identity information via tokens, ensuring that client applications can authenticate users and access basic profile information without needing to handle sensitive credentials directly. Through flows like the Authorization Code Flow, OIDC provides a secure method for accessing protected resources while minimizing exposure to potential risks.
What is Authorization code flow?
The Authorization code flow is the only flow supported by Incode from OpenID Connect (OIDC) protocol. This flow involves several steps, including authentication, authorization, and the exchange of tokens.
The typical use cases for the authorization code flow include web applications, native applications and single-page applications that require secure authentication and access to protected resources. This mechanism provides the benefit of not exposing any tokens to the browser or end-user.
In the first step of the authorization code flow, the client application initiates the flow by making a request to the authorization server. The user is then redirected to the authorization server's login page, where they enter their credentials and consent to the permissions requested by the client.
Once the user is authenticated and has granted permission, the authorization server returns an authorization code to the client. The client then exchanges the authorization code for access and ID tokens that can be used to access protected resources.
It's worth noting that the original authorization code flow is designed for client applications that can securely store a client secret. Native applications and other clients that can't securely store a client secret may need to use the authorization code flow with PKCE (Proof Key for Code Exchange) instead. Incode supports Authorization code flow with using PKCE as well.
Here is the Auhtorization Code flow as integrated with Incode and Verify app for user identity verification:
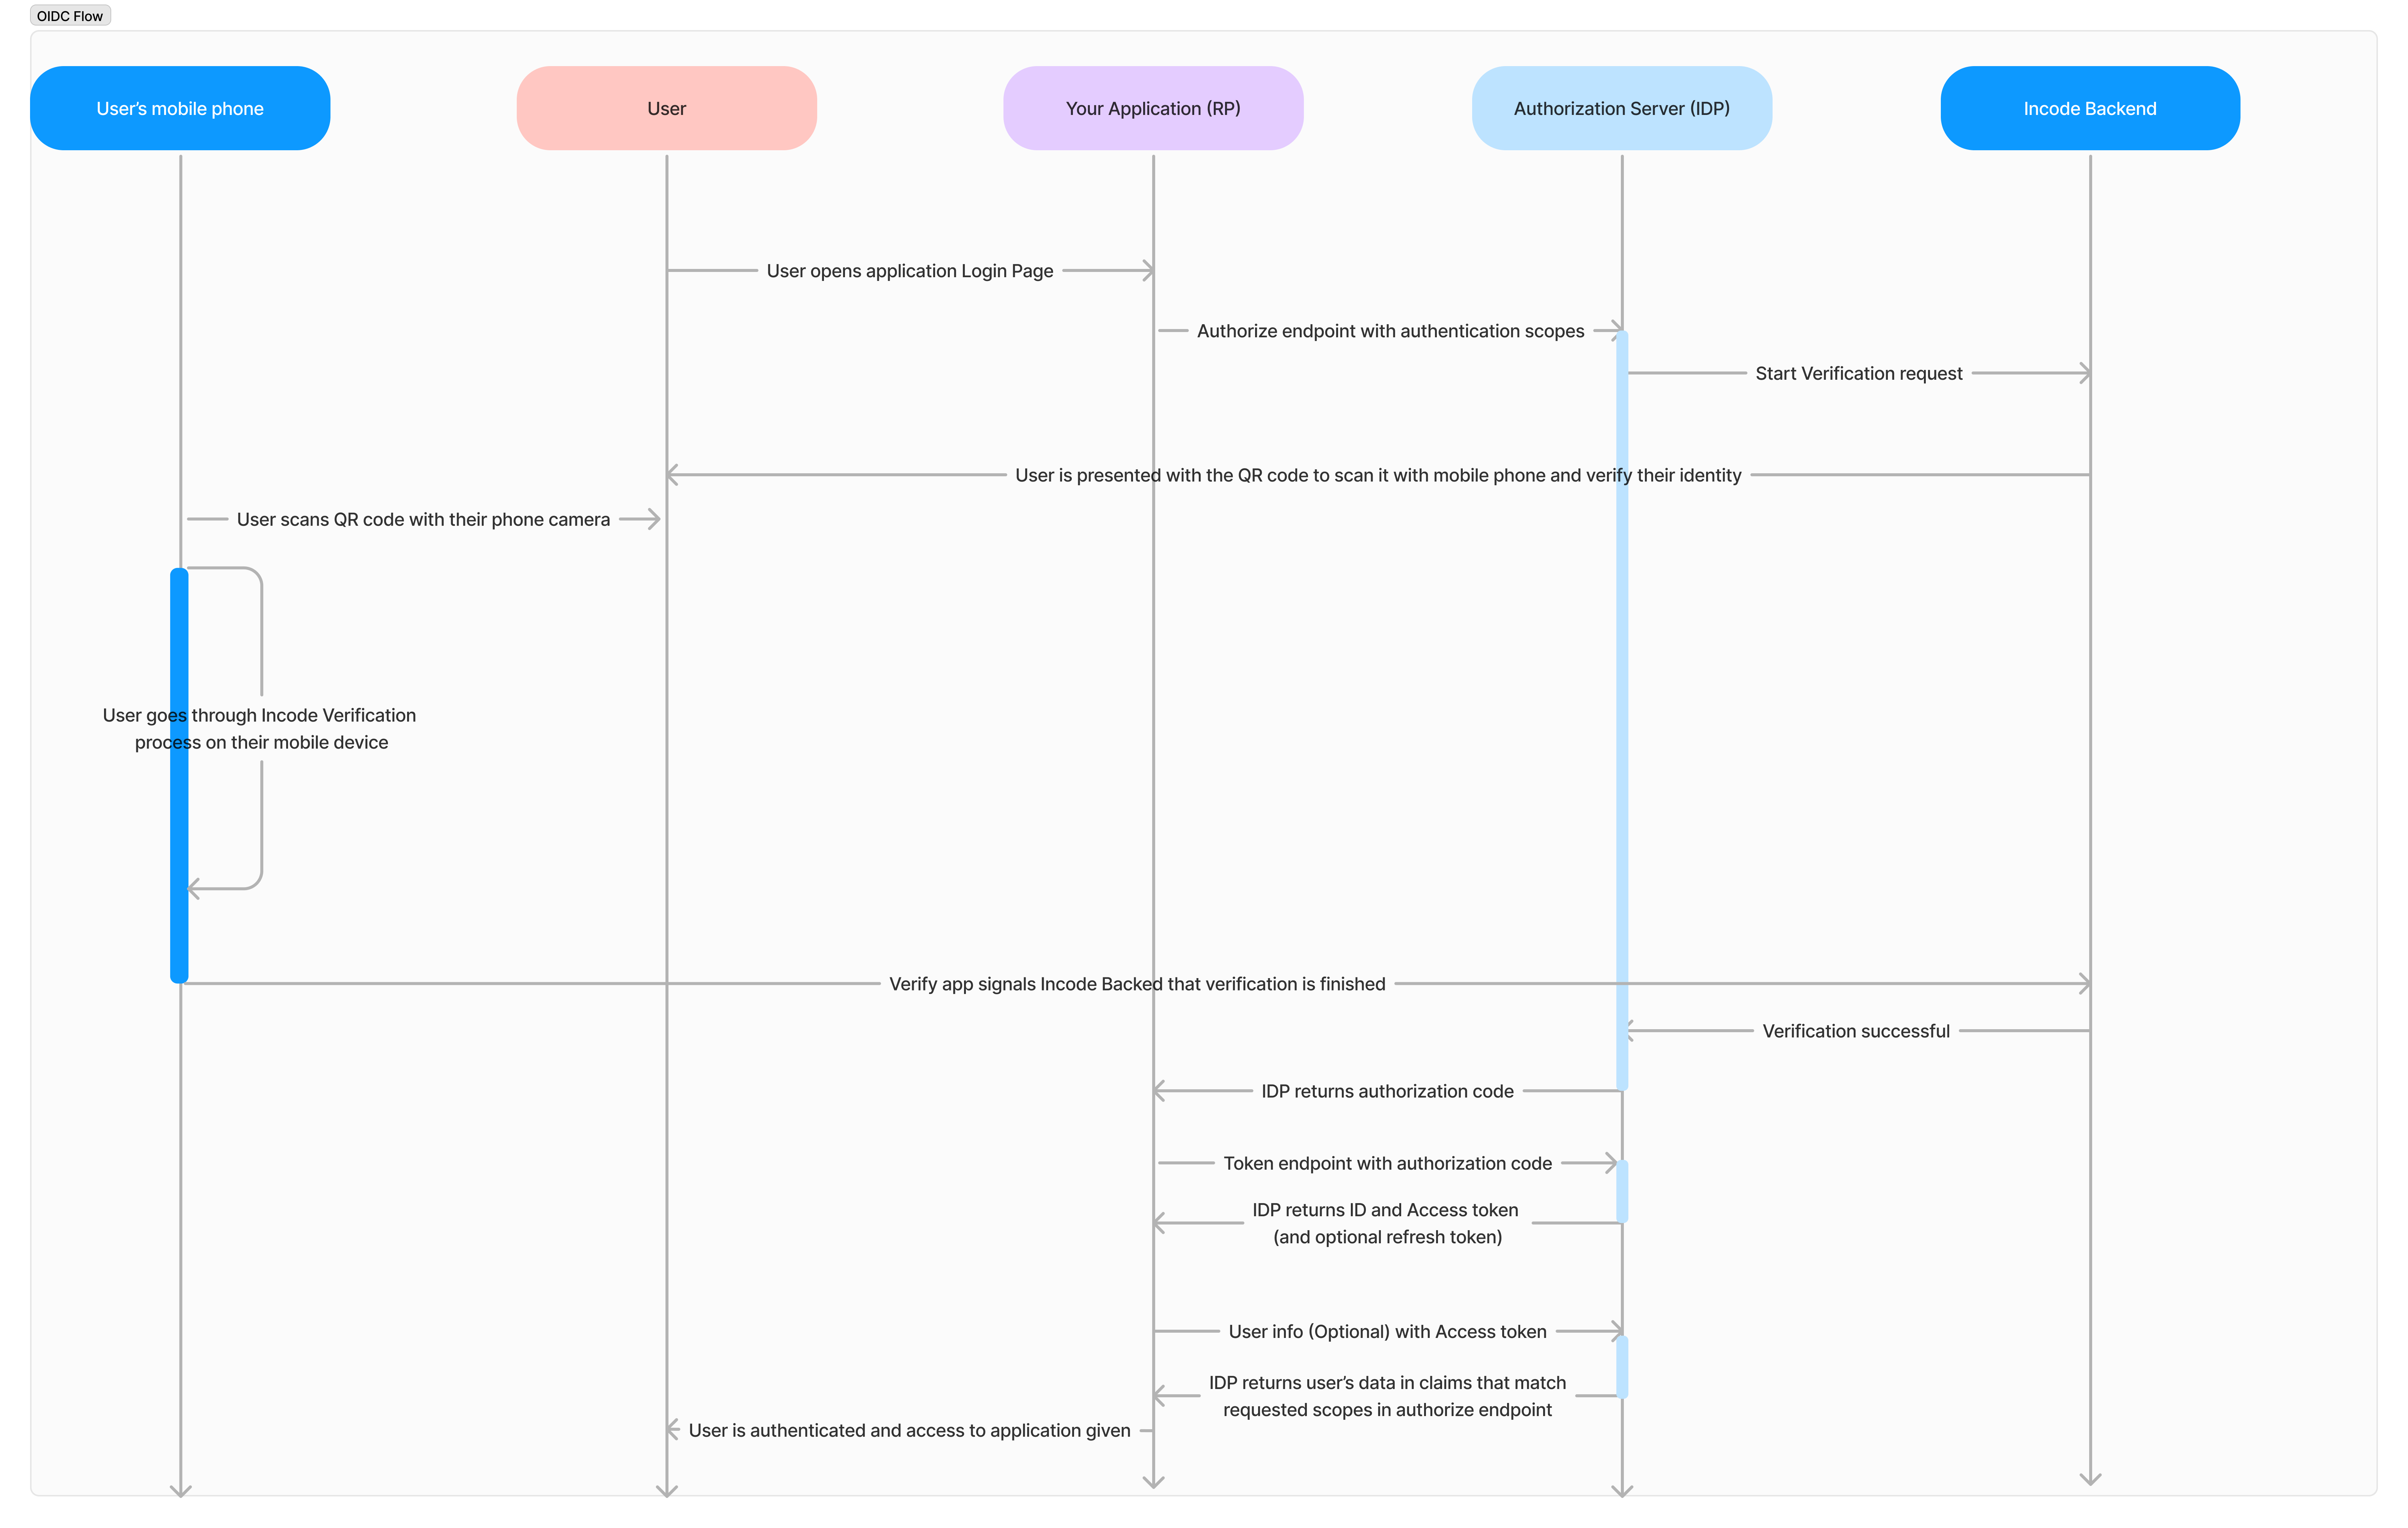
Authorization code flow
Set up Guide
This guide walks you through the process of setting up an OIDC-based Authenticator for Incode Workforce which serves as Identity Provider (IDP) to your application (which is a Relying Party, RP in this case).
Step 1: Create OpenID Connect Integration
In your Workforce dashboard, navigate to Integrations and click New Integration. Choose OpenID Connect integration and click Continue.
Step 2: Set up authentication method (Mandatory)
Here you should give your integration a name so you can identify it in you Workforce Dashboard and specify all details needed to register you application to Incode IDP. Once you have selected required options, you can move to the next step. You can also later edit your configuration, but you must make sure your implementation corresponds to the changes in the declared configuration.
-
Client ID: Incode has generated client ID you should send in the OIDC requests. This uniquely identifies this particular configuration.
-
Authentication method: Incode offers client authentication methods as described in OIDC Spec. Although multiple authentication methods can be declared to the IDP, you must specify which one is used in the Authorization Request. Therefore, you should create separate OIDC integrations, each dedicated to a specific authentication method.
- Client Secret Post: This authentication method is also used when the client application can securely store a client secret. It involves including the client's ID and secret in the request body in the form of a multipart/form-data message. Incode generates a client secret for each integration and it is available for you below. It is a good practise to occasionally change client secret. By clicking Generate button, new secret will be created that should be used in requests further on.
- Client Secret Basic: This authentication method is used when the client application can securely store a client secret. It involves including the client's ID and secret in the request header in the form of a base64 encoded string. Incode generates a client secret for each integration and it is available for you below. It is a good practise to occasionally change client secret. By clicking Generate button, new secret will be created that should be used in requests further on.
- Client Secret JSON Web Tokens (JWT): This method is similar to basic authentication, but instead of including the client's ID and secret, it includes a digitally signed JWT in the body (
assertionparameter) RFC7523 section 2.2. The JWT contains information about the client and is used to verify the client's identity.
Step 3: Copy endpoints
As OIDC specification defines a requests, Incode IDP declares a set of endpoints to which requests should be made. Use this information to configure your relying party. Here is a brief explanation how each of these are used, For further reference, check the OpenID Connect Core 1.0 specification
- Issuer URL:
<https://{incode-server-url}>
- Purpose: Identifies the authorization server issuing the tokens (ID Tokens, Access Tokens). This URL represents the base of the Identity Provider (IDP).
- Usage: The Issuer URL is used to verify that the tokens issued by the server are from the expected authorization server. It ensures the your application (Relying Party) can trust the tokens by checking the "iss" (issuer) claim in the token against this URL.
- Authorize URL:
<https://{incode-server-url}/oauth2/authorize>
- Purpose: This is the URL where the your application sends the user to initiate the authentication process performed by Incode.
- Usage: The client application redirects the user to this endpoint to start the authentication flow (typically with an authorization code request). The user is prompted to perform identity verification with Incode, and once authenticated, they are redirected back to the redirect URI specified in request. This redirect_uri must match one of the Redirect URIs declared in the previous configuration step.
- Token URL:
<https://{incode-server-url}/oauth2/token>
- Purpose: The token endpoint is used to exchange an authorization code or refresh token for an access and an ID token.
- Usage: After the client obtains the authorization code (from the Authorize URL), it sends a request to the Token URL to retrieve the access token and ID token needed for further interaction with the Identity Provider or protected resources.
- JWKS URL:
<https://{incode-server-url}/oauth2/jwks>
- Purpose: JWKS (JSON Web Key Set) URL hosts the public keys that are used to verify the signatures of the JWT (JSON Web Token) issued by the authorization server.
- Usage: The client uses this URL to fetch the public keys required to verify the integrity and authenticity of the JWTs (ID tokens, access tokens) it receives from the IDP.
- Userinfo URL:
<https://{incode-server-url}/userinfo>
- Purpose: This endpoint is used to retrieve user profile information (claims) after the user has been authenticated and the tokens have been issued.
- Usage: The client sends a request to this URL, typically with the access token, to get more information about the authenticated user (e.g., name, email). It is part of the OIDC protocol for obtaining user identity data.
Step 4: Specify Redirect URI (Mandatory)
Redirect URI is a mandatory parameter. When registering your application with the Identity Provider (IDP), you must specify one or more redirect URIs by clicking on + button. Later, in the Authorization Request made to the IDP, the redirect URI must match one of the URIs that were provided in these settings. This is passed as a parameter called redirect_uri in the authorization request. If undeclared redirect uri is sent in request, this will result with an error.
Step 5: Set additional configuration (Optional)
- Refresh Token: This is an optional setting. When selected, IDP will return refresh token together with access token. A refresh token is a long-lived token that allows the application to obtain a new access token without requiring the user to re-authenticate.
- Require PKCE as additional verification: PKCE (Proof Key for Code Exchange) is an extension to the OAuth 2.0 Authorization Code Flow designed to improve security, especially for public clients such as mobile or single-page applications (SPAs). For details about PKCE refer to official specification RFC 7636 - Proof Key for Code Exchange (PKCE)
Endpoints specification
Authorization Endpoint
The Authorization Endpoint is a key part of the OpenID Connect (OIDC) and OAuth 2.0 authentication flow. It is used to initiate the authentication process and obtain an authorization code that can be exchanged for tokens (such as an access token and ID token). Below is a user-friendly specification for the Authorize URL.
Endpoint URL:
https://{incode-server-url}/oauth2/authorize
HTTP Method:
GET
Required Parameters:
-
client_id:- Description: The unique identifier for the client (Relying Party) that was provided when the client registered with the Identity Provider (IDP).
- Example:
client_id=your-client-id
-
response_type:- Description: Defines the type of response the client is expecting. In most OpenID Connect flows, this will be
code(for the authorization code flow). - Example:
response_type=code
- Description: Defines the type of response the client is expecting. In most OpenID Connect flows, this will be
-
redirect_uri:- Description: The URL where the authorization server will send the user after they approve or deny the request. This URI must be pre-registered with the IDP.
- Example:
redirect_uri=https://yourapp.com/callback
-
scope:- Description: Defines the type of access being requested. The scope
openidmust always be included for OIDC requests. Additional scopesprofile,emailare required for configuring Incode authenticator. - Example:
scope=openid profile email - Supported scopes:
openid(mandatory),profile(mandatory),email(mandatory),address,phone,selfie,selfie_attestation,id_attestation,incode_id
- Description: Defines the type of access being requested. The scope
-
state:- Description: A random string generated by the client that is included in the request. It is returned to the client in the response, ensuring the integrity of the request.
- Example:
state=random-string
-
login_hint:- Description: A parameter used to provide a hint to the authentication server about the identifier of the user who is being verified. This is an email address or a username depending on what is imported in the employee directory.
- Example:
[email protected]
Optional Parameters:
-
code_challenge(PKCE):- Description: If using the PKCE flow, this parameter holds the hashed value of the code verifier.
- Example:
code_challenge=hashed-code-verifier
-
code_challenge_method(PKCE):- Description: Specifies the method used to hash the code verifier. Incode supports only
S256(SHA-256) method. - Example:
code_challenge_method=S256
- Description: Specifies the method used to hash the code verifier. Incode supports only
-
prompt:- Description: Specifies whether the user should be prompted for re-authentication. Values include:
login: Forces re-authentication.consent: Ensures that the consent screen is shown.none: No user interaction; fails if the user is not already authenticated.
- Example:
prompt=login
- Description: Specifies whether the user should be prompted for re-authentication. Values include:
-
nonce:- Description: A string value used to associate the client session with the ID token for token replay prevention.
- Example:
nonce=random-nonce
-
response_mode:- Description: Specifies how the authorization server should return the response. Common values include:
query: Parameters returned in the query string.fragment: Parameters returned in the fragment portion of the URL.
- Example:
response_mode=query
- Description: Specifies how the authorization server should return the response. Common values include:
Example Authorization Request:
GET https://{incode-server-url}/oauth2/authorize?
client_id=your-client-id&
response_type=code&
redirect_uri=https://yourapp.com/callback&
scope=openid%20profile%20email&
state=random-string&
[email protected]&
code_challenge=hashed-code-verifier&
code_challenge_method=S256
Response:
- If the user authenticates successfully, the server will redirect them to the specified
redirect_uriwith the following query parameters:code: The authorization code that can be exchanged for tokens.state: The state value that was originally passed in the request for integrity checking.
Example Success Response:
https://yourapp.com/callback?code=authorization-code&state=random-stringError Responses:
If the authentication request fails, the server will redirect to the redirect_uri with an error message.
Example Error Response:
<https://yourapp.com/callback?error=access_denied&error_description=User+denied+the+request>Token Endpoint
The Token Endpoint is used to exchange an authorization code for tokens, including the access token and ID token, which the client can use to access protected resources or retrieve user information.
Endpoint URL:
https://{incode-server-url}/oauth2/token
HTTP Method:
POST
Required Parameters:
-
grant_type:- Description: Specifies the grant type being used. For the Authorization Code flow, the value should be
authorization_code. For refreshing tokens, the value should berefresh_token. - Example:
grant_type=authorization_code
- Description: Specifies the grant type being used. For the Authorization Code flow, the value should be
-
code:- Description: The authorization code that the client received from the Authorization Endpoint. This is used to verify that the client was authorized to receive tokens.
- Example:
code=your-authorization-code
-
redirect_uri:- Description: Must match the exact redirect URI that was used in the original authorization request.
- Example:
redirect_uri=https://yourapp.com/callback
-
client_id:- Description: The client ID that the client application was issued when it registered with the Authorization Server (IDP).
- Example:
client_id=your-client-id
-
client_secret(for confidential clients):- Description: The client secret issued to the client during registration. This is used for authentication of confidential clients.
- Example:
client_secret=your-client-secret
Optional Parameters:
-
code_verifier(for PKCE):- Description: The original code verifier used to create the code challenge during the authorization request (in PKCE flow).
- Example:
code_verifier=your-original-code-verifier
-
refresh_token(when using refresh tokens):- Description: The refresh token used to obtain a new access token when the previous access token has expired.
- Example:
refresh_token=your-refresh-token
Example Token Request:
POST /oauth2/token HTTP/1.1
Host: {incode-server-url}
Content-Type: application/x-www-form-urlencoded

grant_type=authorization_code&
code=your-authorization-code&
redirect_uri=https://yourapp.com/callback&
client_id=your-client-id&
client_secret=your-client-secret
Response:
If the request is successful, the server responds with a JSON object containing the tokens.
Example Success Response:
{
  "access_token": "your-access-token",
  "id_token": "your-id-token",
  "token_type": "Bearer",
  "expires_in": 3600,
  "refresh_token": "your-refresh-token"
}access_token: Used to access protected resources (APIs).id_token: Contains information about the authenticated user (used in OpenID Connect).token_type: Typically "Bearer".expires_in: The number of seconds before the access token expires.refresh_token: Optional, used to get a new access token when the current one expires.
Error Responses:
If something goes wrong during the token request (e.g., invalid code, expired code), the server responds with an error message.
Example Error Response:
{
  "error": "invalid_grant",
  "error_description": "Authorization code has expired"
}
Common Error Codes:
invalid_grant: The provided authorization code is invalid or has expired.invalid_request: The request is missing required parameters or has invalid values.unauthorized_client: The client is not authorized to use this endpoint.insufficient_scope: When exchanging authorization code for tokens, this usually happens when a client requests more privileges than were granted during the initial authorization.
UserInfo Endpoint
The UserInfo Endpoint in OpenID Connect (OIDC) is used to retrieve information (claims) about the authenticated user. This endpoint provides profile data such as the user's name, email, and other information, depending on the scopes requested during the authentication process.
Endpoint URL:
https://{incode-server-url}/userinfo
HTTP Method:
GET
Required Parameters:
access_token:- Description: The access token that was issued to the client as part of the token exchange. This token must include the necessary scopes (e.g.,
profile,email) to access specific user information. - Usage: Typically sent in the Authorization header as a Bearer token.
- Example:
Authorization: Bearer your-access-token
- Description: The access token that was issued to the client as part of the token exchange. This token must include the necessary scopes (e.g.,
Response:
If the access token is valid and authorized for the requested scopes, the server responds with a JSON object containing the user's claims (information).
Example Success Response:
{
  "sub": "1234567890",
  "email":"[email protected]",

}
Error Responses:
If there’s an issue with the request (e.g., invalid token or insufficient scope), the server responds with an error message.
Example Error Response:
{
  "error": "invalid_token",
  "error_description": "The access token is expired, revoked, malformed, or invalid for other reasons."
}
Common Error Codes:
invalid_token: The access token is invalid or has expired.insufficient_scope: The access token does not have the required scopes to access the user info.
Scopes and corresponding claims:
The client must request specific scopes during the initial authentication process in order to retrieve the corresponding claims via the UserInfo Endpoint.
| Scope | Claims |
|---|---|
| openid (mandatory) | No specific claims. This scope is required for all OpenID Connect authentication flows. |
| profile | name, family_name, given_name, middle_name, gender, birthdate, locale, updated_at |
email | |
| address | address |
| phone | phone_number |
| selfie | selfie |
| selfie_attestation | liveness_score_value, liveness_score_status, recognition_value |
| id_attestation | id_photo_security_and_quality_tests, id_specific_tests, id_overall_score, id_overall_status |
| incode_id | Information about user specified in Workforce Dashboard: Settings->Data Scopes. |
Resources
The official OpenID Connect specification is documented in a series of RFCs published by the IETF. The key RFCs for OpenID Connect are:
- OAuth 2.0 Authorization Framework (OAuth 2.0) - RFC 6749
- Bearer Token Usage - RFC 6750
- OpenID Connect Core 1.0 (Defines how to perform user authentication) - OpenID Connect Core 1.0 Specification
- OAuth 2.0 for Proof Key for Code Exchange (PKCE) (RFC 7636) - RFC 7636 - Proof Key for Code Exchange (PKCE)